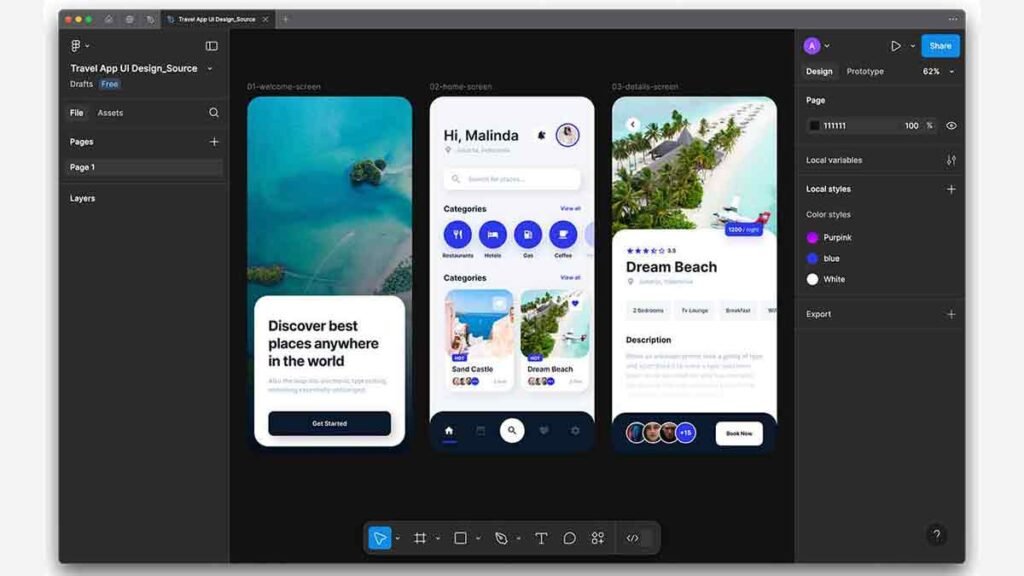
Creating a travel app UI design can be an exciting way to explore user interface design while offering users a seamless and visually appealing experience. In this tutorial, we’ll walk you through designing a travel app in Figma with a focus on modern aesthetics, usability, and functionality. We’ve also included a free Figma source file with three screens to help you get started. Whether you’re a beginner or someone looking to enhance your UI design skills, this tutorial is for you.
To learn Figma, UI/UX design, web design, mobile app ui design, responsive design, no-code development, and AI-powered tools, and to download premium quality UI kits, Check out my YouTube channel (@uixDesignAcademy) for simple and easy beginner tutorials!
Travel App UI Design Overview
The travel app we’ll design includes three primary screens: “Get Started,” “Home,” and “Details.” Each screen is crafted with a flat design style and vibrant colors to match the energetic theme of travel.
1. Get Started Page
The Get Started page serves as the user’s first impression of the app. Here are the key design elements:
Background Image: A large, high-quality background image that conveys a sense of adventure and wanderlust.
Info Card: A small, semi-transparent card overlay that provides introductory text or instructions. Use rounded corners and soft shadows to give it a modern look.
2. Home Page
The Home page is the main hub of the travel app, designed for easy navigation and quick access to essential features.
Top Section:
User Info: Display the user’s profile picture and name for personalization.
Notification Icon: A small bell icon to notify users of updates or offers.
Search Bar: A prominent search bar for users to find destinations, accommodations, or activities.
Categories:
Use visually appealing icons and labels to represent travel categories such as “Beaches,” “Mountains,” and “City Tours.”
Include a “View All” button to explore more categories.
Top Places:
Display cards with information about popular destinations.
Each card includes an image, name, label (e.g., “Trending” or “New”), the distance from the user’s location, and the number of users who have visited.
Navigation Bar:
A bottom navigation bar with five essential icons: Home, Calendar, Search, Favorites, and Settings.
3. Details Page
The Details page provides in-depth information about a selected destination.
Large Image: A full-width image showcasing the destination.
Key Info:
A small label indicating the price per night.
The destination’s rating, displayed using stars or numerical values.
Title and Location:
A bold title for the destination’s name.
A secondary label for the location.
Features:
Highlight amenities such as bedrooms, lounge areas, breakfast availability, etc.
Description:
A short paragraph describing the destination.
Visitor Info:
Circular images of people who have visited or are currently there.
A prominent “Book Now” button to encourage action.
Design Style
The travel app follows a flat design trend with vibrant colors that align with the travel theme. This approach ensures the interface is visually appealing and easy to use. Here are some tips for achieving this style:
- Use a bright and cohesive color palette inspired by travel destinations.
- Incorporate modern typography for headings and body text.
- Ensure elements have ample spacing to maintain a clean layout.
Why Figma for UI Design?
Figma is a powerful design tool that is perfect for beginners and professionals alike. It allows you to create, prototype, and collaborate on designs seamlessly. Here’s why you should consider starting with Figma:
- User-Friendly Interface: Figma’s intuitive interface makes it easy to learn and use.
- Cloud-Based: Work from anywhere and collaborate with team members in real time.
- Free Plan: Figma offers a robust free plan, making it accessible to everyone.
- Extensive Resources: Access templates, plugins, and tutorials to speed up your design process.
Getting Started with Figma
If you’re new to Figma, here’s how you can start designing:
Create a Free Account: Sign up on Figma’s website to get started.
Explore Templates: Browse Figma’s community for free templates and UI kits.
Learn the Basics:
Familiarize yourself with the interface, including the toolbar and layers panel.
Practice using basic tools like shapes, text, and pen tool.
Prototype Your Design: Use Figma’s prototyping features to create interactive mockups.
With Figma, designing a travel app or any UI project becomes an enjoyable and productive experience. Download the free source file included in this tutorial and start creating your own travel app UI design today!
Want to learn how to design responsive landing page design, Check here