In this Figma tutorial, I will walk you through the design of a beautiful and functional furniture app with a clear focus on user experience and smooth navigation. The app features four essential screens, each with its own unique design elements to enhance usability and make it easy for users to explore and shop for furniture. Let’s dive into the details of the app design!
To learn Figma, UI/UX design, web design, mobile app ui design, responsive design, no-code development, and AI-powered tools, and to download premium quality UI kits, Check out my YouTube channel (@uixDesignAcademy) for simple and easy beginner tutorials!
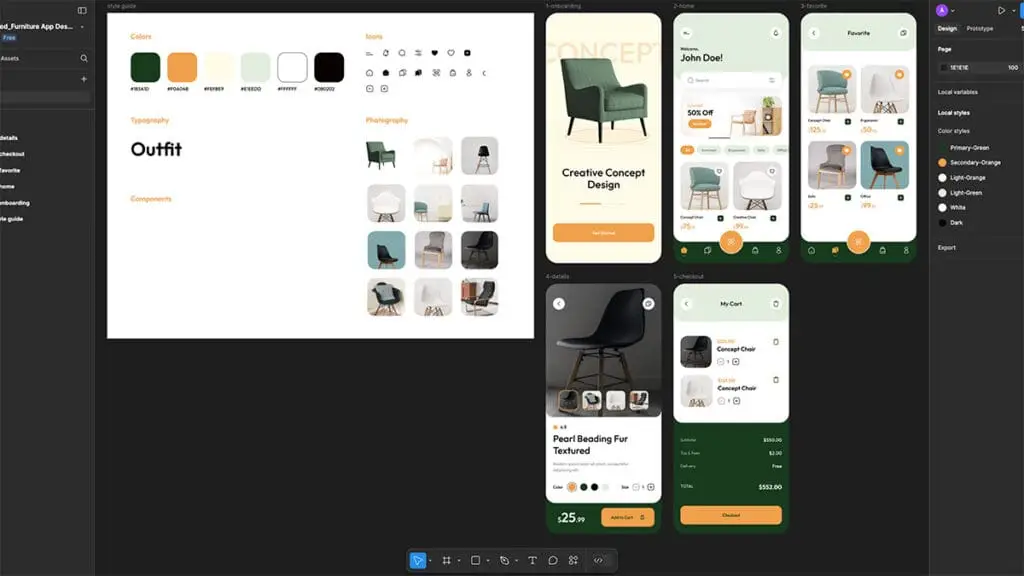
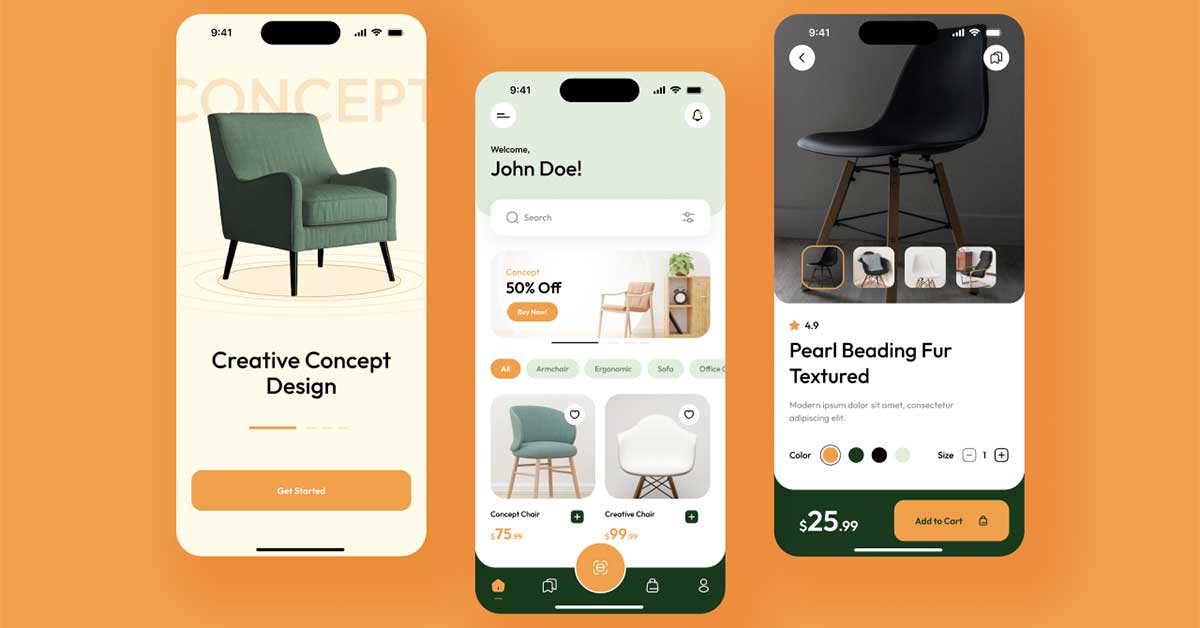
1. Get Started Screen
The first screen in this furniture app design is the Get Started Screen, which serves as an introductory onboarding experience for new users. The screen features a series of images or guides to help users understand the app’s functionality and benefits. Users can swipe through the images, exploring the app’s features before they move forward. Once users are ready, they simply click the “Start” button to transition to the home page and begin their shopping journey.
2. Home Screen
The Home Screen is the core of the app’s design, providing easy access to everything users need. At the top of the screen, there are two essential icons: the notification bell on the right and the menu button on the left. The menu button opens up additional navigation options, providing users with quick access to other parts of the app. Below the welcome message, users will find a search bar, where they can type in keywords to search for specific furniture items.
Beneath the search bar, there is a featured product banner that highlights special items, promotions, or new arrivals. This is followed by filter options that allow users to refine their search based on categories such as type of furniture, price range, or style.
The product grid is displayed below the filters, showing a list of products with their names, prices, and an option to either bookmark or add to cart. The navigation bar at the bottom contains five key links for easy access: Home, Bookmark, Scan/Find, Cart, and Profile. This layout ensures users can easily navigate through the app to find what they need.
3. Bookmark Screen
The Bookmark Screen gives users the ability to save products they like for future reference. This screen displays all the items the user has bookmarked, and they can choose to either remove items from the list or add them to their cart for easy purchase. This feature is perfect for users who want to keep track of their favorite furniture pieces before making a final decision.
4. Product Details Screen
The Product Details Screen is where users can dive deep into the details of a specific item. The top section features a large product image with additional small images that users can scroll through to preview the product from different angles. Below the image gallery, there is a rating section, allowing users to see reviews and ratings from other buyers.
Next, the product’s title and a short description are displayed, providing users with essential information about the product. Below that, users can select from different color options, sizes, and choose the quantity they want to purchase. Finally, there is a prominent “Add to Cart” button, allowing users to quickly add the product to their shopping cart for checkout.
Creating App Designs in Figma: Step-by-Step
If you’re interested in designing an app like this, Figma is the perfect tool for creating interactive and visually appealing app designs. Here’s how you can get started:
Set Up Artboards: To create your app design in Figma, the first step is to create artboards for each screen of your app. For our furniture app, we’ll create artboards for the Get Started Screen, Home Screen, Bookmark Screen, and Product Details Screen. Figma makes it simple to set the correct dimensions for mobile app screens, ensuring your design will be responsive and optimized for different devices.
Add UI Elements: Next, you can start adding UI elements such as buttons, icons, input fields, and images to your artboards. Figma’s drag-and-drop interface makes it easy to position and resize these elements until you achieve the desired layout. For example, when designing the home screen, you would add a search bar, navigation icons, and product grids just as described in the app design details.
Prototyping: One of the key features of Figma is its prototyping capabilities. Once your screens are set up, you can link different screens together to create a clickable prototype. This allows you to simulate the app’s navigation and user flow, helping you visualize how users will interact with the app in real-time.
Interactive Components: Figma also offers interactive components, which can be used to design dynamic elements like buttons, dropdowns, and carousels. This is especially useful for features like the product image slider on the product details screen or the menu button on the home screen, giving users an immersive experience while navigating the app.
Designing Responsively: Figma’s responsive design features ensure that your app will look great on various screen sizes. You can adjust your artboards to different mobile screen dimensions, ensuring your app design is consistent across all devices.
Want to Learn How I Designed This Furniture App?
If you’re eager to learn how I created this complete furniture app design in Figma, you can click the Watch Tutorial button below! In the tutorial, I’ll walk you through the entire design process, from setting up your artboards to creating prototypes, and show you how to add interactive components to bring your app design to life.
Whether you’re a beginner or an experienced designer, this step-by-step guide will help you create stunning app designs and sharpen your skills in Figma.
Also if you want to learn web design, click here
By following this tutorial, you’ll be able to master the essential elements of app design, create beautiful layouts, and learn valuable techniques to build your own fully functional app in Figma. Start creating today, and elevate your design skills with Figma!