Task management apps play a crucial role in productivity, helping users organize their daily to-do lists, set deadlines, and track progress. In this tutorial, we’ll walk you through the process of designing a Task Management App UI in Figma or adobe xd, ensuring a clean, modern, and user-friendly experience. If you’re looking to create a high-converting task management software UI, this guide is for you!
Why Design a Task Management App?
Figma or adobe xd is one of the best UI/UX design tools, offering real-time collaboration, a powerful component system, and an intuitive interface. Whether you’re designing a mobile or web app, Figma provides all the necessary features to create a professional task management app UI design. If you’re a SaaS startup or a UI/UX designer aiming for high engagement rates, this tutorial will help you optimize your design for better user experience and higher retention rates.
Step-by-Step Process of Designing a Task Management App UI
1. Setting Up the Figma Workspace
Before designing, set up a new Figma file with a mobile or web frame, depending on your target platform. Organize your layers and create a style guide including colors, typography, and components. A well-structured design will improve usability and lead to a higher conversion rate.
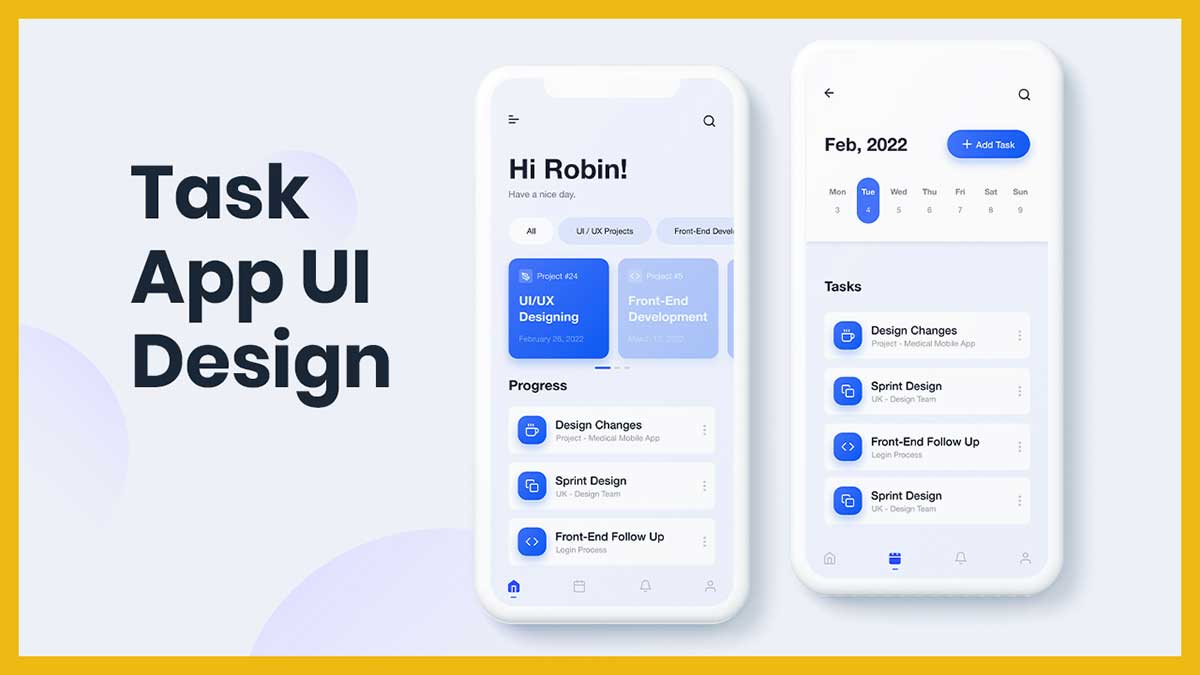
2. Designing the Dashboard Screen
The dashboard is the core of a task management app UI, displaying a list of tasks, categories, and deadlines. Key UI elements to include:
- Task cards with priority indicators (High, Medium, Low)
- A floating action button (FAB) to add new tasks
- Filters to sort tasks by category or completion status
- Clear CTAs (Call-to-Action) for improved click-through rates (CTR)
3. Creating the Task Details Screen
A well-designed task details screen allows users to view and edit tasks efficiently. Features to include:
- Task title and description
- Due date and reminder settings
- Progress tracking with checklists
- Collaboration options for team projects
- Smart notifications for higher engagement rates
4. Adding an Intuitive Navigation System
A seamless navigation experience is key to usability. Implement a bottom navigation bar or a hamburger menu for quick access to:
- Dashboard
- Completed Tasks
- Calendar View
- Settings
A well-structured navigation system ensures a better user experience (UX), reducing bounce rates and increasing the app’s overall retention rate.
5. Prototyping and Interactions
Figma’s prototyping features help bring your design to life. Add interactive elements like:
- Clickable buttons for adding/editing tasks
- Swipe gestures to mark tasks as completed
- Smooth transitions between screens for better UX
- Animated UI elements to boost user engagement
Best Practices for a High-Converting Task Management App UI
- Use a minimalist design with clear typography and sufficient white space
- Keep task creation and management intuitive with fewer steps
- Ensure color contrast for readability and accessibility
- Use micro-interactions to improve user engagement
- Optimize the interface for mobile users to increase mobile app retention rates
Watch the Full Video Tutorial
Want a hands-on demonstration of how to design a high-converting task management app in Figma? Watch my detailed tutorial on YouTube where I guide you through each step with real-time design insights.
Designing a high-converting task management app UI in Figma is an exciting process that blends creativity with functionality. By following these steps, you can create a sleek and efficient UI that enhances productivity and user experience. If you found this guide helpful, don’t forget to like, share, and subscribe to my channel for more UI/UX design tutorials!
Also check out another Best Task Manager App with AI Features here, and if you want to want to become best designer in figma, you can watch beginners tutorial on YouTube channel (@uixdesignacademy)